Streamlining Network Traffic Analysis: A Guide to Using CICFlowMeter on Windows
Introduction
In the intricate world of network security and traffic analysis, having the right tools is essential for professionals and enthusiasts alike. One such indispensable tool is CICFlowMeter, a powerful network traffic flow generator widely recognized in the cybersecurity community. This open-source tool, available on GitHub, is particularly known for its versatility and depth in analyzing network flows, making it a valuable asset for anyone keen on understanding and securing their network environment.
In this blog post, we will delve into the specifics of running CICFlowMeter on a Windows platform. Windows, with its widespread usage and unique system architecture, presents specific challenges and opportunities for network traffic analysis. We aim to simplify these complexities by providing a step-by-step guide on how to effectively deploy and utilize CICFlowMeter in a Windows environment. Whether you are a cybersecurity professional, a network administrator, or just a tech enthusiast, this guide is designed to equip you with the knowledge and skills needed to leverage CICFlowMeter for comprehensive network analysis on Windows systems.
Stay tuned as we embark on this technical journey, unraveling the nuances of CICFlowMeter and harnessing its full potential to enhance your network analysis capabilities.
Running CICFlowMeter on Windows: A Comprehensive Guide
Network traffic analysis is crucial for understanding and securing digital environments. CICFlowMeter, a renowned Java-based tool for network traffic flow analysis, has become a go-to solution for many researchers. This blog post will guide you through the process of setting up and running CICFlowMeter on a Windows system.Install Java and JDK
CICFlowMeter is written in Java, so the first step is to install Java and the Java Development Kit (JDK). For this setup, I used:
- Java Version 8 Update 381
- JDK Package: jdk-21_windows-x64_bin.exe
You can download these from the official Java website. Ensure that you install the correct version for your Windows operating system.
Install IntelliJ IDEA Community Edition
To compile CICFlowMeter, you need an Integrated Development Environment (IDE). IntelliJ IDEA Community Edition is a robust choice for this purpose. Download it from JetBrains' official site.
Install Maven
Maven is a build automation tool used primarily for Java projects. Download apache-maven-3.9.6-bin.zip from the Maven official website. Follow the installation steps provided in this detailed guide: Install Maven on Windows.
Install Gradle
Gradle is another powerful tool that automates the building, testing, deployment, and more of software packages. Download gradle-8.5-bin.zip and follow the installation steps found at Gradle Installation Guide.
Install WinPcap
CICFlowMeter requires packet capturing capabilities, provided by WinPcap. Download npcap-1.78.exe from Npcap official site. Make sure to enable the "Install Npcap in WinPcap-API-compatible Mode" option during installation.
Open the CICFlowMeter Project in IntelliJ IDEA
Once IntelliJ IDEA is installed, open the CICFlowMeter project folder within the IDE.
Configure Maven in IntelliJ IDEA
Navigate to File -> Settings -> Build, Execution, Deployment -> Build Tools -> Maven. Change the Maven home directory to the folder where you installed Maven. Click 'OK' to save these settings.
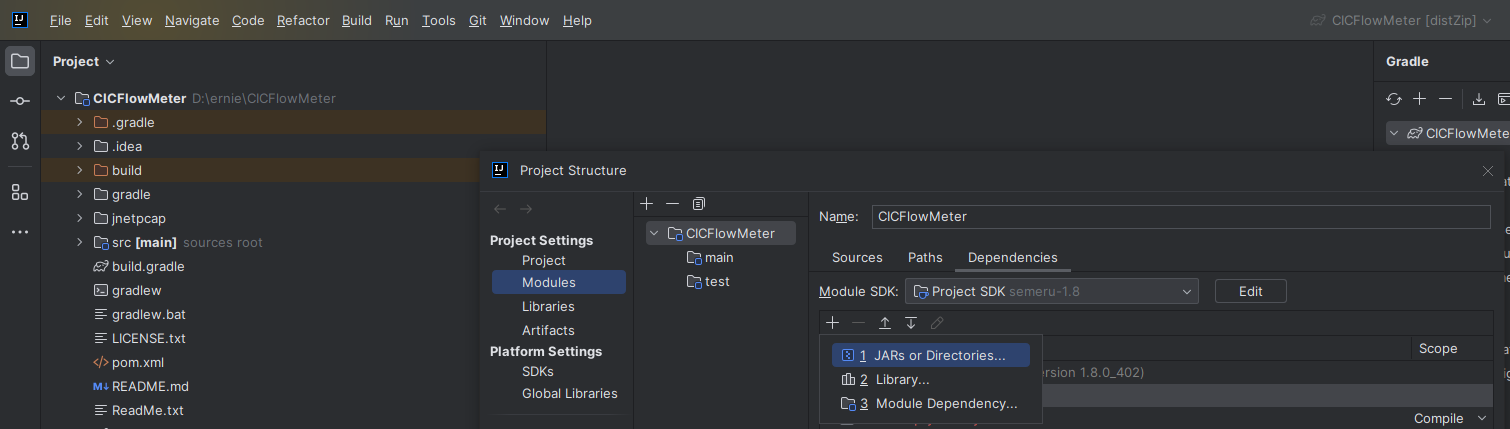
Add Jnetpcap to the Project
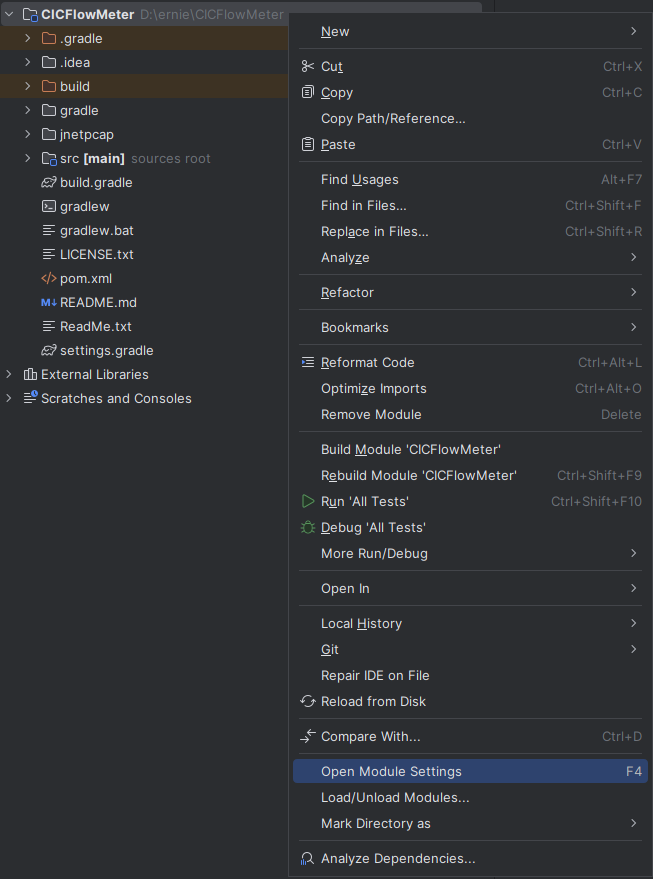
Jnetpcap is essential for packet capturing in CICFlowMeter. In IntelliJ IDEA, go to File -> Project Structure -> Modules. Then, choose "Add Jars and Directories" and add jnetpcap.dll and jnetpcap.jar from the <project folder>/jnetpcap/win/jnetpcap-1.4.r1425 directory.
Compile with Gradle
To compile the project, use Gradle. Click on the Execute Gradle Task icon on the right side of IntelliJ IDEA to run gradle distZip. After successful compilation, you'll find CICFlowMeter4.0.zip in the <project folder>\build\distributions directory.

Resolving Potential Errors with Kotlin Plugin (Optional)
In some cases, you might encounter an error like (136: unable to resolve class CommandLineArgumentProvider @ line 136, column 73. CommandLineArgumentProvider()). This issue can often be resolved by disabling the Kotlin plugin in IntelliJ IDEA. For detailed steps on how to do this, refer to this StackOverflow post: Disable Kotlin Compiler in IntelliJ IDEA for Maven Java Projects. This issue is also discussed in the JetBrains YouTrack: IntelliJ 2023.3 Grails 3 fails with unable to resolve class CommandLineArgumentProvider.
Unzip and Launch CICFlowMeter
Once you have successfully compiled CICFlowMeter, unzip the CICFlowMeter4.0.zip file. Inside, you will find the CICFlowMeter.bat file. Execute this file to open CICFlowMeter.
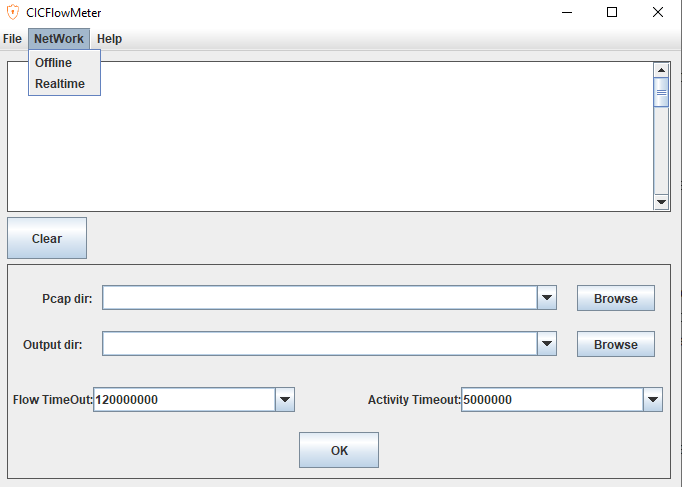
Conducting Offline Pcap Analysis
In CICFlowMeter, navigate to NetWork -> Offline for Pcap analysis. This functionality allows you to analyze network traffic captured in Pcap files. The output includes a comprehensive list of extracted bi-flow features defined by a 5-tuple.
These features include:
- Flow ID, Source IP, Source Port, Destination IP, Destination Port, Protocol, Timestamp
- Flow Duration, Total Forward and Backward Packets
- Total Length of Forward and Backward Packets
- Packet Length (Max, Min, Mean, Std) for Forward and Backward
- Flow Bytes/s, Flow Packets/s
- Inter-Arrival Time (IAT) statistics (Mean, Std, Max, Min) for Flow and individual directions (Forward, Backward)
- Flags (PSH, URG, ACK, etc.)
- Packet Size statistics
- Window Size
- Active and Idle time statistics
- Label (requires manual labeling or an additional program)
By analyzing these features, users can gain detailed insights into network traffic behavior, which is crucial for tasks such as intrusion detection, network monitoring, and forensic analysis.
Conclusion: Harnessing the Power of CICFlowMeter for Enhanced Network Analysis
As we conclude this guide, it's important to reflect on the significance of CICFlowMeter in the realm of network traffic analysis. By following the steps outlined above, you now have a powerful tool at your disposal for dissecting and understanding network flows on a Windows environment. CICFlowMeter's ability to provide detailed insights into network traffic makes it an invaluable asset for cybersecurity professionals, network administrators, and technology enthusiasts.
The process of setting up CICFlowMeter, from installing Java, IntelliJ IDEA, Maven, and Gradle, to configuring and running the tool, might seem daunting at first. However, the effort pays off when you're able to analyze network traffic with precision and depth. Whether your goal is to enhance network security, perform forensic analysis, or simply understand network behavior, CICFlowMeter offers a comprehensive solution.
As with any tool, the journey doesn't end with installation and setup. The true value of CICFlowMeter lies in its application. Experiment with different pcap files, analyze various network scenarios, and explore the multitude of features it offers. The more you use CICFlowMeter, the more proficient you'll become in interpreting its outputs and leveraging its capabilities for your specific needs.
The field of network analysis is constantly evolving, and tools like CICFlowMeter are essential for staying ahead in this dynamic and challenging domain. Happy analyzing, and may your journey through the bytes and packets of network traffic lead to enlightening discoveries and enhanced security!