Step-by-Step Guide to Configuring a 5G SA Network with Open5GS and MEC on Virtual Machines
Introduction
In the rapidly evolving landscape of telecommunications, the deployment of 5G networks represents a monumental leap forward, offering unprecedented speeds, lower latency, and the ability to connect a multitude of devices simultaneously. At the heart of this transformation is the Next Generation Core Network (NGCN), with Open5GS being a pivotal open-source implementation that allows for the flexible and scalable deployment of 5G services. As we delve deeper into the realm of 5G, the integration of Multi-access Edge Computing (MEC) emerges as a critical component, bringing processing power closer to the end-user and enabling a wide array of latency-sensitive and bandwidth-intensive applications.
In this blog post, we will embark on a comprehensive journey to set up a Standalone (SA) 5G network using Open5GS, configured across three virtual machines (VMs) to simulate a real-world deployment. This setup not only provides a practical understanding of the intricacies involved in 5G network deployment but also showcases the integration of MEC, a cornerstone technology for realizing the full potential of 5G.
Our setup will involve the installation of Open5GS SA on one VM to act as the core network, UERANSIM on another VM to simulate the 5G User Equipment (UE) and radio access network (RAN), and a dedicated VM for the User Plane Function (UPF) configured as an MEC instance. The choice of VirtualBox as the virtualization platform offers a flexible and accessible environment for this setup, allowing for a detailed exploration of 5G network functions and MEC capabilities within a controlled environment.
The network configuration will utilize a NAT network, ensuring that our simulated 5G network components can communicate effectively while remaining isolated from the host system's network, providing a secure and straightforward setup process.
By the end of this post, you will gain not only a theoretical understanding of 5G SA networks, Open5GS, and MEC but also practical insights into configuring and testing a 5G network setup. Whether you're a network enthusiast, a researcher, or someone keen on the practical aspects of telecommunications technology, this guide will provide you with the knowledge and skills to explore the cutting-edge of 5G networking.
Preparing the Virtual Environment
There are totally 3 virtual machines, one Open5GS 5GC C-Plane (hostname open5gs), one Open5GS 5GC U-Plane (hostname upf), and one UERANSIM with RAN (hostname gNodeB) and UE (ueransim). Below is a step-by-step guide explaining the process for setting up an Ubuntu 20.04 VM in VirtualBox for the Open5GS 5GC C-Plane, with similar steps applicable for the U-Plane (UPF) and UERANSIM (gNodeB and UE)
-
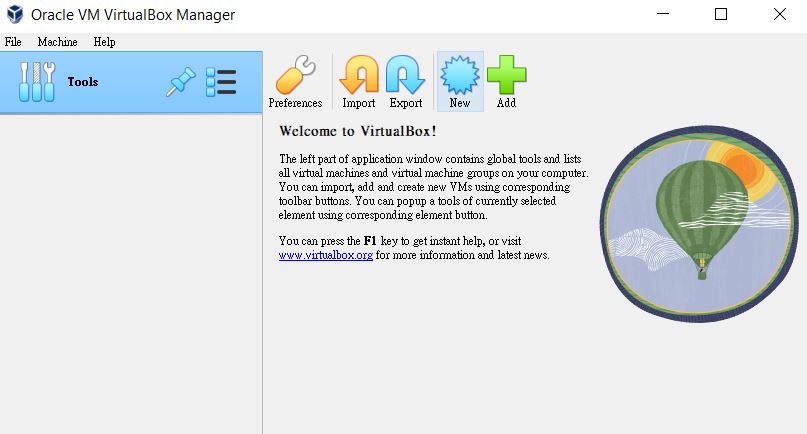
Launching VirtualBox and Creating a New VM
The image shows the Oracle VM VirtualBox Manager. To begin, click on the "New" icon to create a new virtual machine.
-
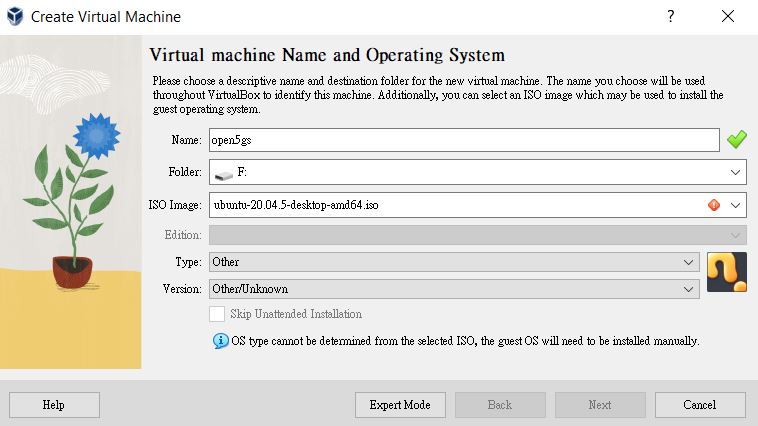
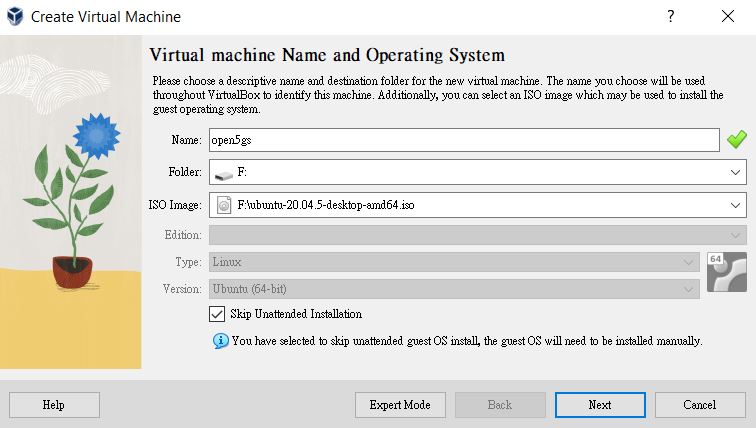
Setting VM Name and Operating System
You are prompted to enter the name of your new VM, choose a folder to store the VM files, and select the operating system. Here, the name is set as "open5gs," and the ISO image for Ubuntu 20.04 is chosen. Ensure that the 'Type' is set to 'Linux' and 'Version' to 'Ubuntu (64-bit)' to match the operating system of the ISO image.
-
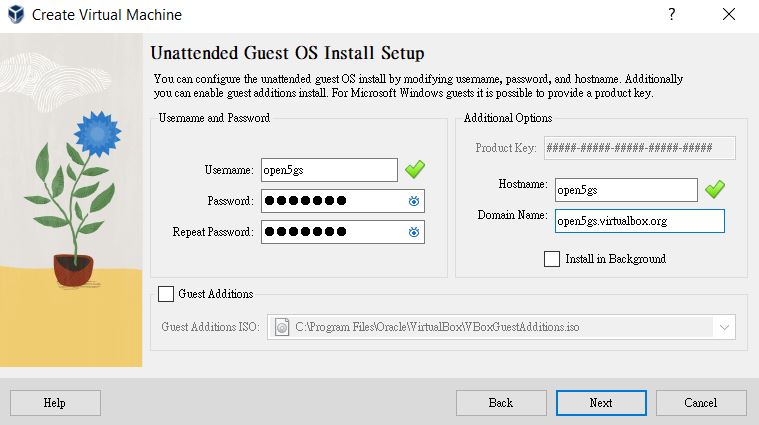
Configuring Unattended Installation
The image shows the unattended guest OS install setup, where you can configure the VM with a default username "open5gs" and password "open5gs." The hostname is also set as "open5gs" to identify the VM on the network. You can select the option to install guest additions if needed.
-
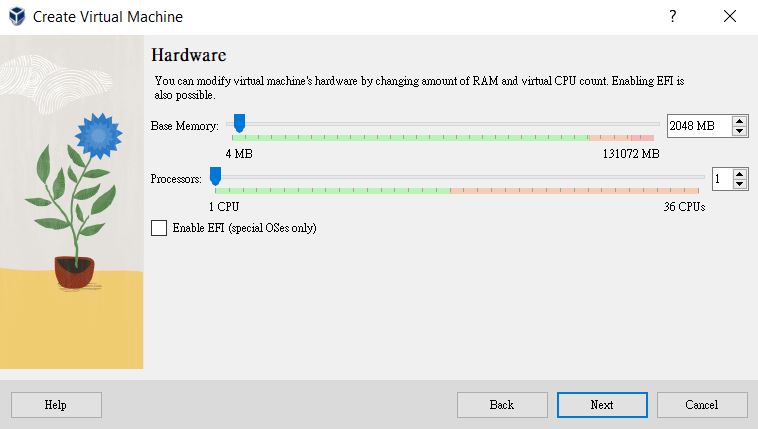
Allocating Memory and CPU
You are configuring the base memory (RAM) and the number of CPUs for the VM. It is recommended to allocate sufficient memory and CPU resources to ensure smooth operation of the 5G network functions, typically at least 2048 MB of RAM and at least 1 CPU core.
-
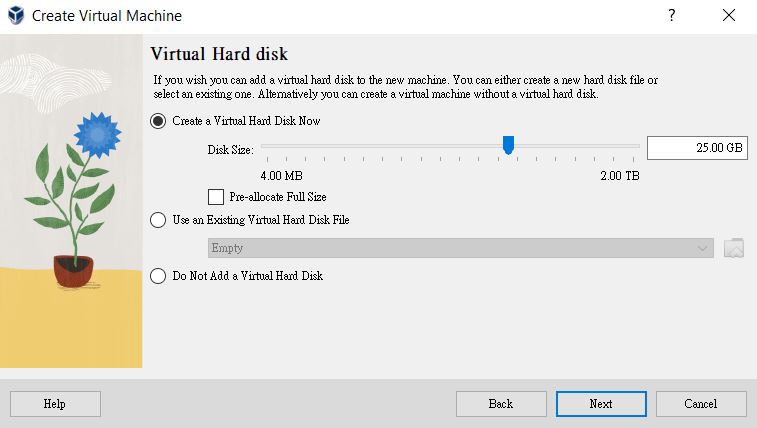
Creating a Virtual Hard Disk
The image shows the Oracle VM VirtualBox Manager. To begin, click on the "New" icon to create a new virtual machine.
-
Finalizing VM Operating System Settings
Before installation, ensure that the 'Type' and 'Version' are correctly set to 'Linux' and 'Ubuntu (64-bit)' respectively. This step is crucial for VirtualBox to optimize settings for the guest OS.
-
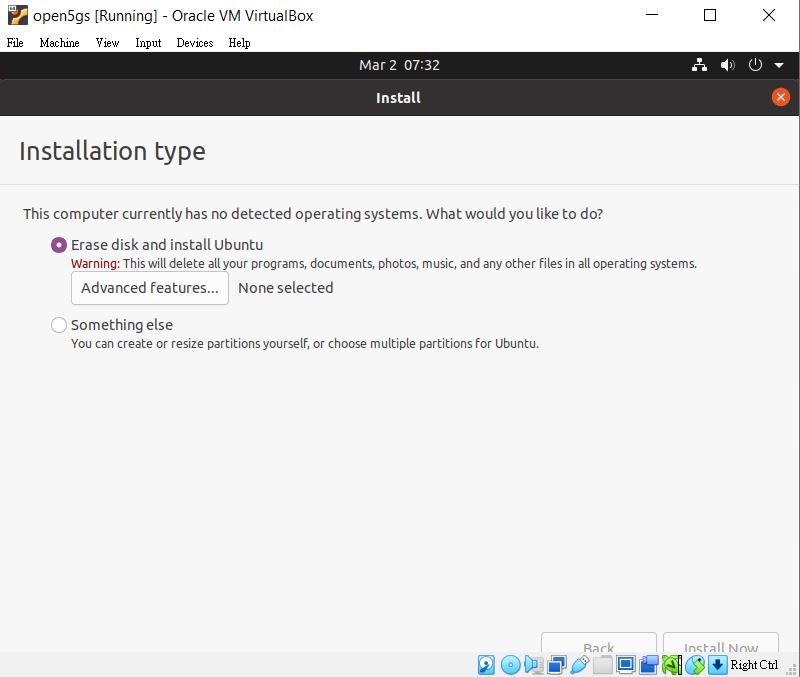
Installing Ubuntu on the VM
The image depicts the Ubuntu installation screen, where you will select "Erase disk and install Ubuntu" to install Ubuntu on the VM's virtual hard drive. This step will format the virtual disk and install the Ubuntu OS.
-
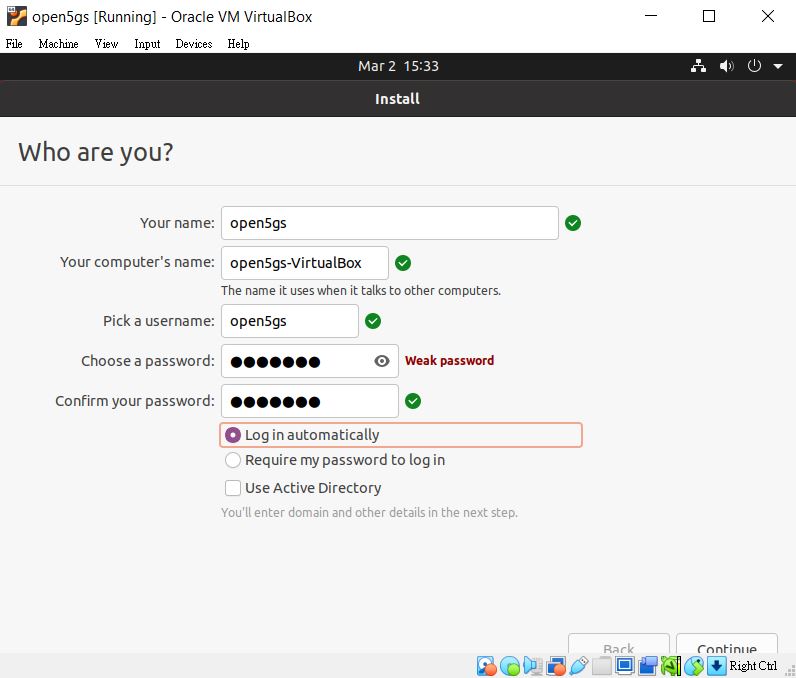
Setting Up User Account and Hostname
During the Ubuntu installation process, you can set the computer's name, choose a username, and set a password for the VM. The example uses "open5gs" for both the computer's name and username, with a chosen password. You can also select whether to log in automatically or require a password on login.
-
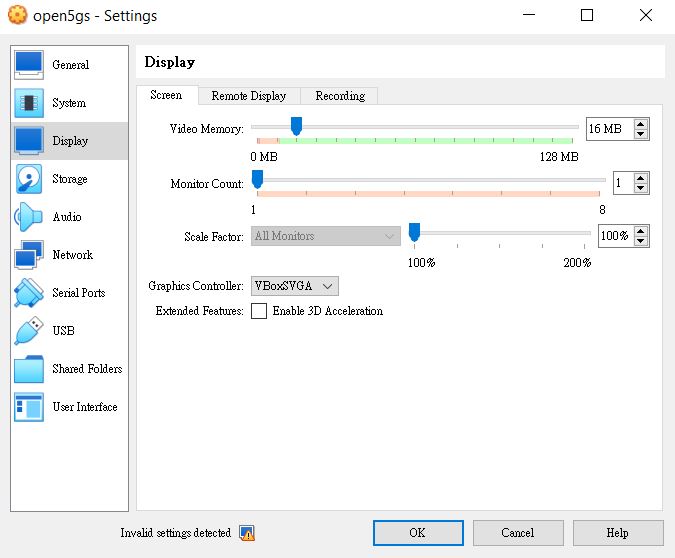
Adjusting VM Display Settings (Optional)
The image shows the settings for the VM's display. You can allocate video memory, select the number of monitors, and enable 3D acceleration if your system supports it. Adjust these settings based on your preference and the capabilities of your host machine.
-
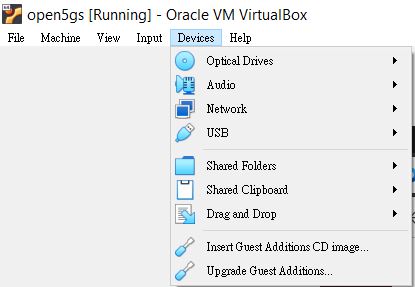
Installing Guest Additions for Enhanced Display Features (Optional)
The image shows the VirtualBox menu for a running virtual machine. To improve display and interaction with the guest operating system, you can install VirtualBox Guest Additions. To do this, click on the "Devices" menu and select "Insert Guest Additions CD image..." This action mounts the Guest Additions ISO in the virtual machine, and you can then run the installation from within the guest OS. Guest Additions provide better video support, seamless mouse integration, shared folders, and more.
-
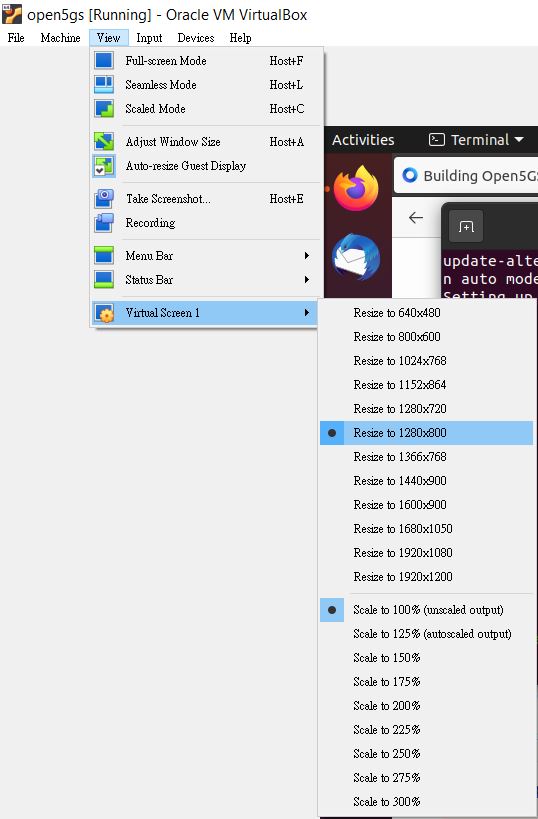
Adjusting Display Settings and Resolution (Optional)
The image displays the "View" menu in VirtualBox where you can adjust the display settings of the virtual machine to better suit your preferences. Here, you can choose different modes such as full-screen or scaled, or you can adjust the window size. Additionally, you can select "Virtual Screen 1" to change the resolution of the guest display. For example, you may choose "Resize to 1280x800" to increase the workspace within the guest OS. This setting is particularly useful if the default resolution is too small or if you need a larger display area for the applications you're running within the virtual machine.
Repeat these steps for the other two VMs, substituting the appropriate names ("upf" for the User Plane Function VM and "ueransim" for the UERANSIM VM) and any other settings specific to those VMs.
By following these steps, you can successfully prepare the virtual environment for your Open5GS and UERANSIM setup. Remember that the username and password for each VM can be customized as per your requirements or security policies.
Installing Open5GS on Ubuntu 20.04 and Configuring Open5GS 5GC Control Plane
To install Open5GS on Ubuntu 20.04 and configure it for a 5G Standalone (SA) Core Network Control Plane (C-Plane) with a Single SMF, you can follow the steps outlined below. This guide will walk you through setting up the environment, installing the necessary dependencies, and modifying the configuration files according to your network setup. The instructions are based on the Open5GS documentation and the provided sample configuration files.
-
Building Open5GS from Sources
You can either build Open5GS from sources or install it using the PPA. If you choose to build it from sources, follow the instructions from the official Open5GS documentation: Building Open5GS from Sources.
This will include cloning the repository, installing prerequisites, compiling the code, and installing the binaries.
-
Configuring Open5GS 5GC C-Plane
Configure the Open5GS 5GC C-Plane with the provided sample configuration files from: Open5GS 5GC & UERANSIM UE / RAN Sample Configuration - Select UPF based on S-NSSAI.
-
Modifying Configuration Files
Modify the configuration files for the AMF, SMF, and freeDiameter according to your network setup:
For amf.yaml, adjust the IP addresses and MCC/MNC to match your NAT network settings and desired MCC/MNC values.
diff default/open5gs/install/etc/open5gs/amf.yaml open5gs/install/etc/open5gs/amf.yaml
419c419
<       - addr: 127.0.0.5
---
>       - addr: 10.0.2.15
425,426c425,426
<           mcc: 999
<           mnc: 70
---
>           mcc: 001
>           mnc: 01
432,433c432,433
<           mcc: 999
<           mnc: 70
---
>           mcc: 001
>           mnc: 01
437,438c437,438
<           mcc: 999
<           mnc: 70
---
>           mcc: 001
>           mnc: 01
Similar changes should be applied to smf.yaml to ensure the SMF is listening on the correct IP and interfacing with the UPF at 10.0.2.8.
diff default/open5gs/install/etc/open5gs/smf.yaml open5gs/install/etc/open5gs/smf.yaml
605,606c605
<       - addr: 127.0.0.4
<       - addr: ::1
---
>       - addr: 10.0.2.15
609a607
>       - addr: 10.0.2.15
611,612c609
<         dnn: internet
---
>       - addr: ::1
816c813,814
<       - addr: 127.0.0.7
---
>       - addr: 10.0.2.8
>         dnn: internet
The nssf.yaml and smf.conf for freeDiameter do not require changes.
-
Installing Open5GS WebUI
To install the WebUI for Open5GS, which provides a graphical interface for managing the 5G core network, follow the instructions from: Install MongoDB 6.0 and Open5GS WebUI.
Setting Up Open5GS 5GC User Plane
Setting up the User Plane Function (UPF) is a critical step in deploying the 5G Standalone (SA) network, as it handles user data packet processing and forwarding. To install and configure UPF on your second VM for Multi-access Edge Computing (MEC) integration, follow the steps below. These instructions are based on building Open5GS from sources as per the official documentation.
-
Building Open5GS from Sources
You can either build Open5GS from sources or install it using the PPA. If you choose to build it from sources, follow the instructions from the official Open5GS documentation: Building Open5GS from Sources.
This will include cloning the repository, installing prerequisites, compiling the code, and installing the binaries.
-
Configuring Open5GS 5GC U-Plane
Since there are no changes needed for the upf.yaml configuration, you can use the default configuration provided by Open5GS. This file is typically located at /etc/open5gs/upf.yaml after installation. However, ensure that the configuration aligns with your network design, especially regarding interface addresses and network functions that the UPF will communicate with.
Deploying UERANSIM for RAN and UE Simulation
Deploying UERANSIM on a virtual machine is essential for simulating the 5G RAN and UE components in your test environment. UERANSIM is an open-source 5G UE and RAN (gNodeB) simulator that allows for testing and development of 5G network functionalities. Below are the steps to install and configure UERANSIM on your third VM.
-
Preparing the Environment
Start by updating the system's package list and installing required dependencies:
sudo apt update sudo apt install git make gcc g++ libsctp-dev lksctp-tools iproute2 -y -
Cloning UERANSIM Repository
Clone the UERANSIM repository from GitHub:
git clone https://github.com/aligungr/UERANSIM cd UERANSIM -
Compiling UERANSIM
Compile the UERANSIM codebase:
makeAfter a successful build, you should have the executables nr-gnb and nr-ue in the UERANSIM directory.
-
Configuring gNodeB
Configure the gNodeB by editing the config/open5gs-gnb.yaml file. Adjust the parameters to match your network setup, including the AMF IP address, gNodeB ID, and PLMN settings. Here's the configuration difference snippet:
diff --git a/config/open5gs-gnb.yaml b/config/open5gs-gnb.yaml
index d0cdc16..b32c2ba 100644
--- a/config/open5gs-gnb.yaml
+++ b/config/open5gs-gnb.yaml
@@ -1,17 +1,17 @@
-mcc: '999'          # Mobile Country Code value
-mnc: '70'           # Mobile Network Code value (2 or 3 digits)
+mcc: '001'          # Mobile Country Code value
+mnc: '01'           # Mobile Network Code value (2 or 3 digits)

 nci: '0x000000010'  # NR Cell Identity (36-bit)
 idLength: 32        # NR gNB ID length in bits [22...32]
 tac: 1              # Tracking Area Code

-linkIp: 127.0.0.1   # gNB's local IP address for Radio Link Simulation (Usually same with local IP)
-ngapIp: 127.0.0.1   # gNB's local IP address for N2 Interface (Usually same with local IP)
-gtpIp: 127.0.0.1    # gNB's local IP address for N3 Interface (Usually same with local IP)
+linkIp: 10.0.2.7   # gNB's local IP address for Radio Link Simulation (Usually same with local IP)
+ngapIp: 10.0.2.7   # gNB's local IP address for N2 Interface (Usually same with local IP)
+gtpIp: 10.0.2.7    # gNB's local IP address for N3 Interface (Usually same with local IP)

 # List of AMF address information
 amfConfigs:
-  - address: 127.0.0.5
+  - address: 10.0.2.15
     port: 38412

 # List of supported S-NSSAIs by this gNB
Replace the address under amfConfigs with the actual IP address of your AMF.
-
Configuring UE
Similarly, configure the UE by editing the config/open5gs-ue.yaml file. Ensure the IMSI, key, OPc, and other parameters are set according to the subscriber information configured in the Open5GS core:
diff --git a/config/open5gs-ue.yaml b/config/open5gs-ue.yaml
index 6dce9cd..eb1ab65 100644
--- a/config/open5gs-ue.yaml
+++ b/config/open5gs-ue.yaml
@@ -1,9 +1,9 @@
 # IMSI number of the UE. IMSI = [MCC|MNC|MSISDN] (In total 15 digits)
-supi: 'imsi-999700000000001'
+supi: 'imsi-001010000000000'
 # Mobile Country Code value of HPLMN
-mcc: '999'
+mcc: '001'
 # Mobile Network Code value of HPLMN (2 or 3 digits)
-mnc: '70'
+mnc: '01'

 # Permanent subscription key
 key: '465B5CE8B199B49FAA5F0A2EE238A6BC'
@@ -20,7 +20,7 @@ imeiSv: '4370816125816151'

 # List of gNB IP addresses for Radio Link Simulation
 gnbSearchList:
-  - 127.0.0.1
+  - 10.0.2.7

 # UAC Access Identities Configuration
 uacAic:
More UERANSIM configuration options please refer to Configuration.
Launching the 5G SA Network
Launching your 5G Standalone (SA) network involves starting the Open5GS 5G Core (5GC) network functions and the User Plane Function (UPF), as well as ensuring that UERANSIM components are ready for communication. Below are the instructions to initiate the 5G SA network on the Open5GS and UPF virtual machines:
On the Open5GS VM (Control Plane):
-
Open a terminal session and navigate to the directory where Open5GS is installed.
-
Start each Open5GS network function in the background by executing the following commands:
./install/bin/open5gs-nrfd &
sleep 5
./install/bin/open5gs-scpd &
sleep 5
./install/bin/open5gs-smfd &
./install/bin/open5gs-amfd &
./install/bin/open5gs-ausfd &
./install/bin/open5gs-udmd &
./install/bin/open5gs-pcfd &
./install/bin/open5gs-nssfd &
./install/bin/open5gs-bsfd &
./install/bin/open5gs-udrd &
./install/bin/open5gs-mmed &
./install/bin/open5gs-sgwcd &
./install/bin/open5gs-sgwud &
./install/bin/open5gs-hssd &
./install/bin/open5gs-pcrfd &
The sleep commands ensure that services with dependencies have time to start up before their dependents.
On the UPF VM (User Plane):
-
Configure the network interface for the UPF by adding a new tunnel interface ogstun:
sudo ip tuntap add name ogstun mode tun sudo ip addr add 10.45.0.1/16 dev ogstun sudo ip link set ogstun up -
Set up IP masquerading to enable NAT for the UE's traffic going through the UPF:
sudo iptables -t nat -A POSTROUTING -s 10.45.0.0/16 ! -o ogstun -j MASQUERADEReplace the address under amfConfigs with the actual IP address of your AMF.
-
Run the Open5GS UPF daemon:
./install/bin/open5gs-upfd
After starting all the network functions and setting up the network interface on the UPF VM, your 5G SA network should be up and running. You can now proceed to connect the UERANSIM gNodeB and UE to test the network's functionality.
Verification and Testing
Verifying and testing the setup is crucial to ensure that all components of your 5G network are functioning as expected. The provided images show the troubleshooting and resolution of issues during the setup process.
-
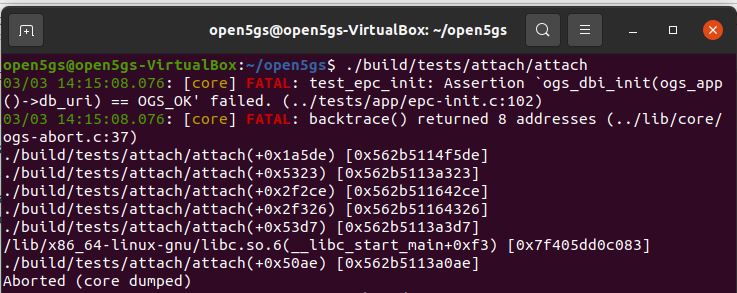
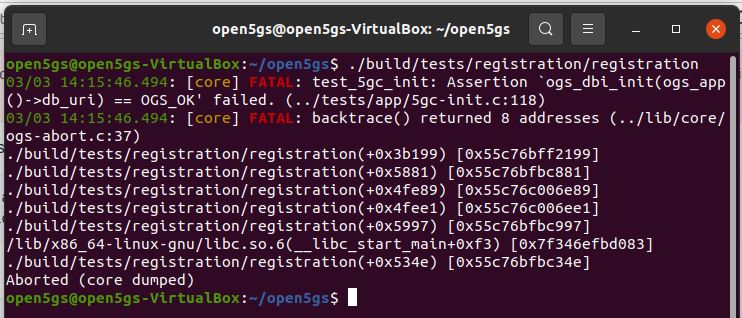
Core Dump in Open5GS Test
The image indicates a core dump occurred during an Open5GS test, with an assertion failure related to database URI connection. This suggests a problem with the database setup, which is critical for Open5GS functioning.
-
Another Core Dump in Open5GS Test
The image shows a core dump with an assertion failure during the 5GC initialization tests. It's again related to the database connection, hinting at potential misconfiguration.
-
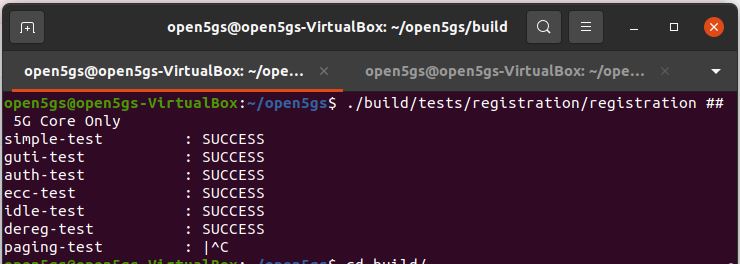
Successful Tests in Open5GS
The image displays a series of successful tests within the Open5GS framework. This suggests that the issues causing the core dumps have been resolved, and the 5GC components are now operating correctly.
-
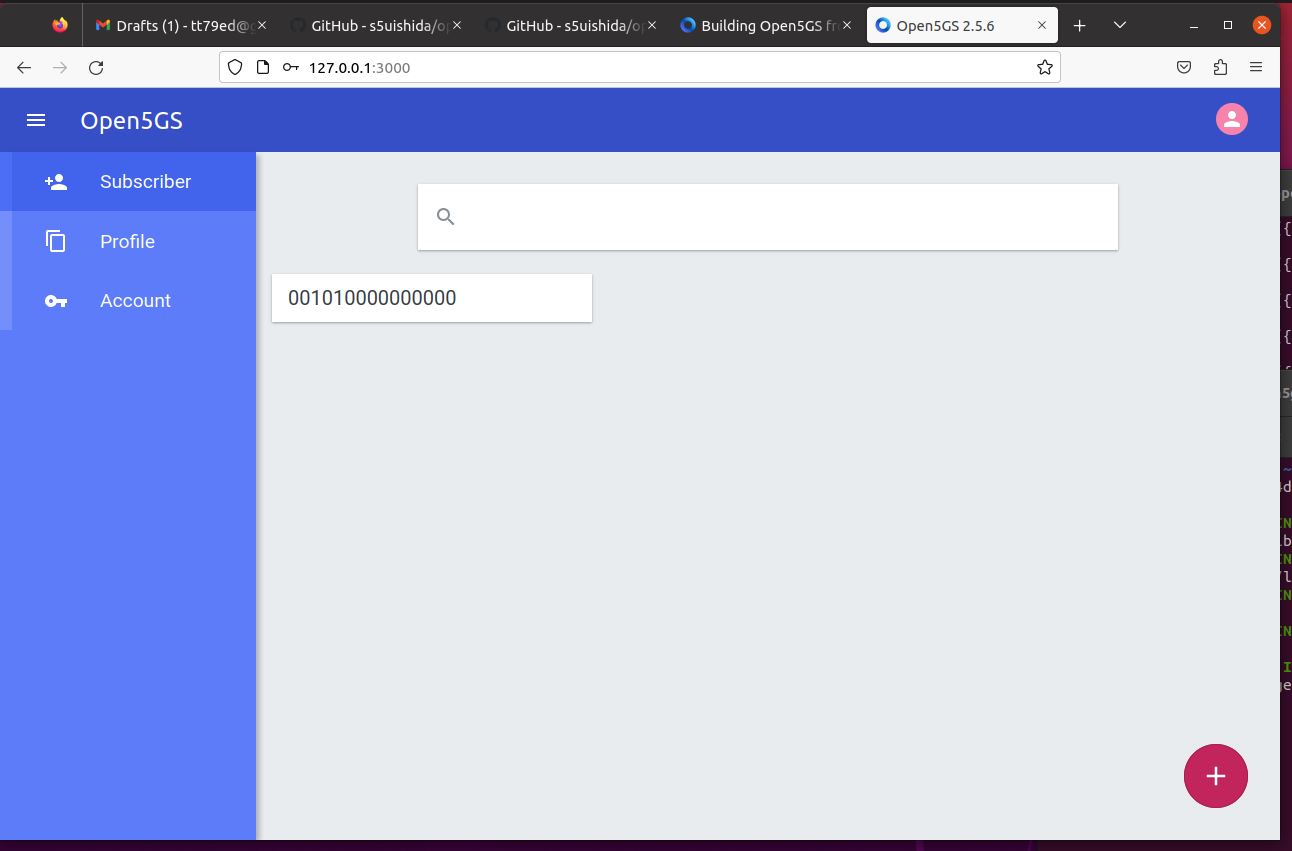
Open5GS WebUI with a Subscriber
The image shows the Open5GS WebUI with a subscriber IMSI visible. This indicates that the WebUI and the Core Network database are operational, and the subscriber data has been successfully entered into the system.
-
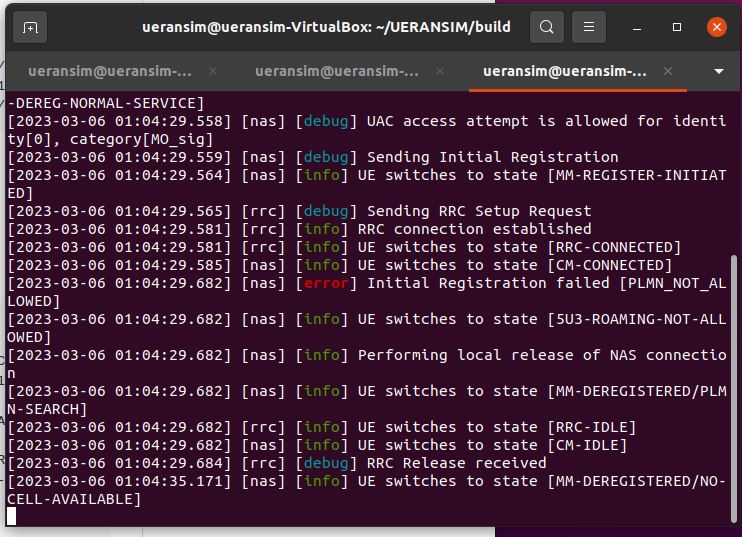
UERANSIM UE Registration Error
The image shows the UERANSIM logs with an "Initial Registration failed" error due to "PLMN_NOT_ALLOWED". This error typically indicates a mismatch between the PLMN settings of the UE and the network.
-
UERANSIM UE Registration Successful
The image shows the UERANSIM logs with a successful initial registration process, indicating that the UE is now correctly registered with the network.
-
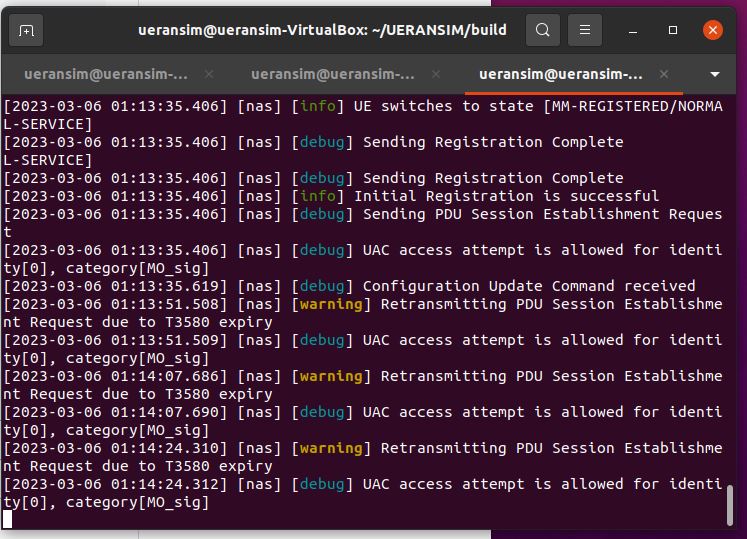
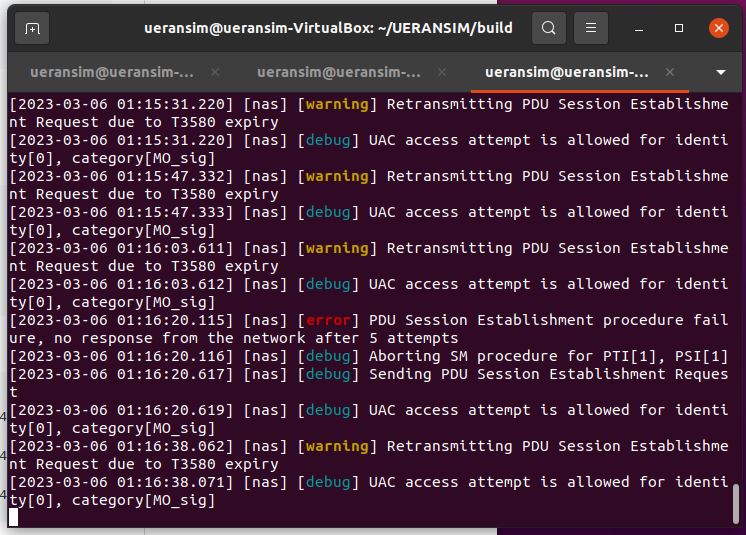
UERANSIM UE Connection Issues
The image shows UERANSIM logs where the UE faces issues with PDU Session Establishment. This could be due to various factors such as network configuration, UPF setup, or issues with the data network name (DNN).
-
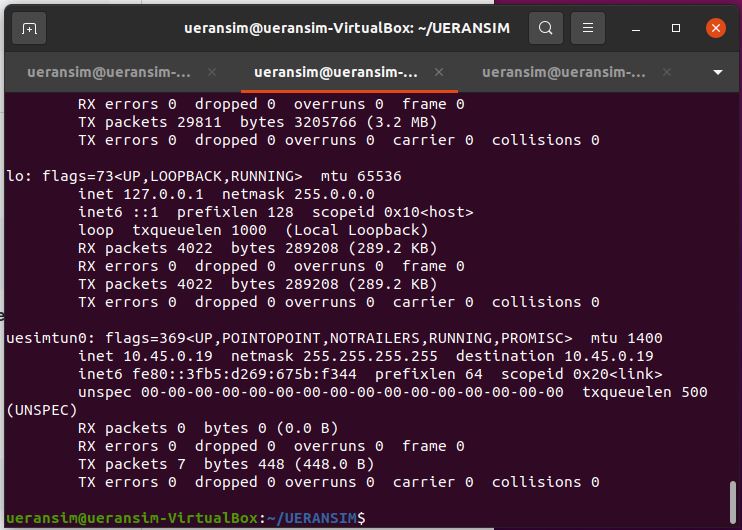
Network Interface Configuration
The image provides a snapshot of the network interface configuration. It shows the ogstun interface with an assigned IP address, indicating that the UPF is configured and ready to handle user plane traffic.
-
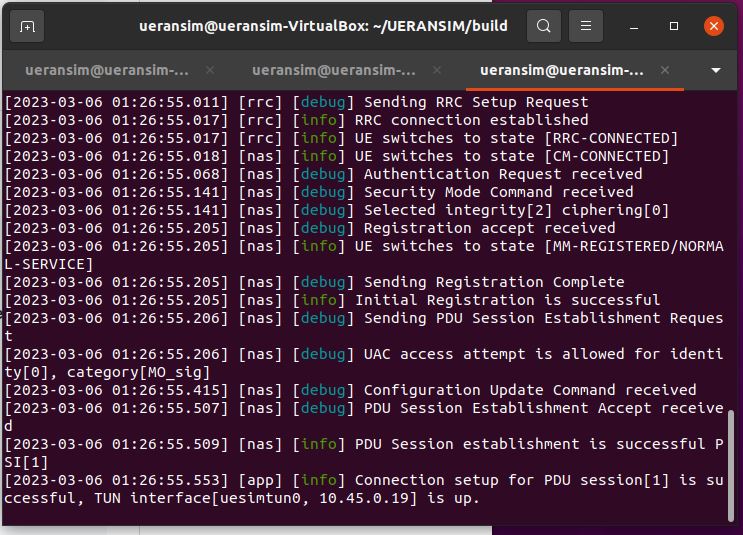
UERANSIM UE Connected and TUN Interface Up
The image depicts UERANSIM logs with successful PDU session establishment, and the TUN interface uesimtun0 is up. This means the UE can now send and receive data through the simulated 5G network.
-
UPF Packet Capture
The image shows a packet capture on the UPF VM, demonstrating that ICMPv6 packets (Router Solicitation) are being sent to the UPF. This is a good sign of network activity and suggests that the UPF is handling traffic as expected.
sudo tcpdump -i ogstun -n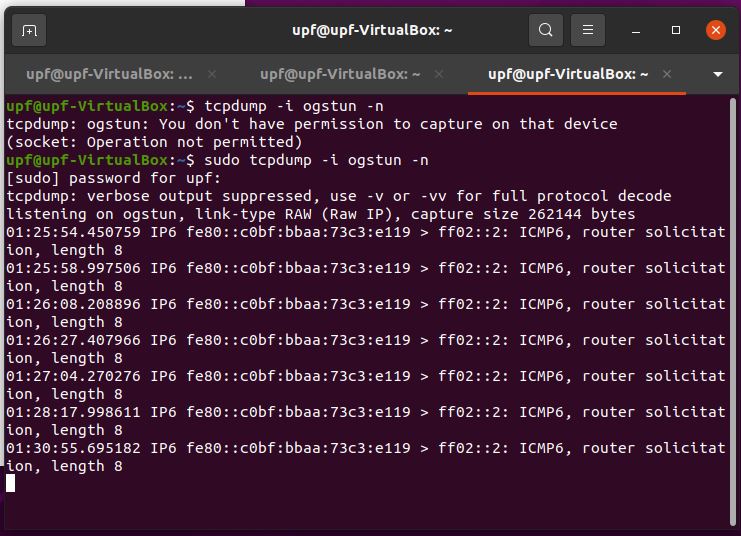
Conclusion and Further Exploration
In conclusion, we have journeyed through the intricate process of setting up a 5G Standalone (SA) network using Open5GS and UERANSIM within a virtualized environment. This setup has provided a practical and controlled platform to understand the deployment and functioning of the 5G Core Network (5GC) and the User Equipment (UE) simulation.
The setup process included preparing the virtual machines, installing and configuring Open5GS for both the Control Plane and User Plane, and deploying UERANSIM to simulate the gNodeB and UE. Each step was critical in establishing a functional 5G network, from updating and preparing the operating system environments to fine-tuning the network configurations and resolving any issues that arose during the testing phase.
The learning outcomes from this exercise are significant. We have gained a deeper understanding of the 5G network architecture, the role and configuration of each network function within Open5GS, and the intricacies of simulating network elements using UERANSIM. This experience has provided valuable insights into network troubleshooting, configuration management, and the importance of meticulous testing.
Looking forward, there is a vast landscape of further exploration and advanced configurations that can be pursued:
- Integration with Real Hardware: Try integrating this setup with actual 5G-capable hardware to test the network in a more realistic environment.
- Performance Testing: Conduct thorough performance testing to assess the capabilities and limits of your 5G network setup under different load conditions.
- Network Slicing: Explore the configuration and management of network slices to support various types of services and applications with differing requirements.
- Security Enhancements: Investigate advanced security features and measures to protect the network and its users, including the implementation of more robust encryption and authentication mechanisms.
- Advanced MEC Applications: Dive into the development and deployment of Multi-access Edge Computing (MEC) applications to leverage low-latency and high-bandwidth capabilities of your 5G network.
- Interoperability Testing: Validate the interoperability of your 5G network with other vendors' equipment and software to ensure compliance with industry standards.
- Automating Operations: Implement automation tools and frameworks to streamline the deployment, management, and scaling of network functions.
- Quality of Service (QoS) Optimization: Experiment with QoS configurations to prioritize traffic and ensure service quality for critical applications.
- Research on 5G Technologies: Engage in research projects that focus on emerging 5G technologies, such as mmWave, Massive MIMO, or advanced coding and modulation schemes.
This setup is just the beginning of what can be an extensive exploration of 5G networking. Whether for educational purposes, research, or practical applications, the skills and knowledge acquired here provide a solid foundation for diving deeper into the potential of 5G technologies.